Josh’s five video editing tips
Published - 14th August 2018

Editing is one of the most important parts of digital marketing – if not the most important. A sloppy edit could mean that a beautiful architectural video will lack pace, have awkward stops and wobbles, and won’t keep a viewer engaged.
Producing a sequence of shots that work well, creating a story and showcasing a building, conference or project fluidly is not a simple task. In this blog I will explain five different editing techniques to help make your edits stand out.
1. FIND THE BEST SHOTS FIRST
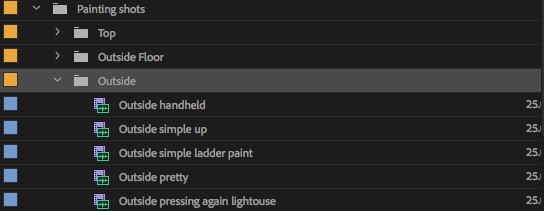
It’s quite easy to grab random shots, put them in your sequence, cut them down and send them off to be finalised. But it’s important to treat editing in the same vein as filming: manage and plan what you are producing, and review and label your shots first in order to see what’s best as well as what will work together.
I tend to use a ‘category of shot – place – type of shot’ method as shown below. Obviously, how you define the shots is what works best for you.

With the above example, I had over 100 shots to look through. Although it may feel like it takes forever to flick through every different piece of film, it will ultimately save time – be that any edits that need doing, shots that need replacing, or getting a better first draft.
2. USE TRANSITION SPARINGLY AND WITH EFFECT
When you’re trying to show off a product, it can sometimes be easy to overuse exciting, dynamic transitions, with lots of cross dissolves and motion effects. If you’re doing this, it often becomes distracting and tends to take away from what the client is wanting to see.
If you’re going to use a funky transition, use it with effect. Find a way to use transitions intelligently and with purpose. Instead of using transitions sporadically, use them in tandem with the next piece of footage. Here’s an example from an Elite project that we’ve been working on, where the push transition slides into the next scene.
I’ve consciously done a slide from right to left, rather than the direction of the camera. As this is part of a long piece, it subconsciously confuses the viewer so it keeps their attention before going into the next part of the video, which highlights the inside. Who knew transitions could be psychological?
3. SPELLING
It’s so easy to misspell when editing; to miss a letter or to get a name wrong. It’s easy because you’re probably more interested in making a cool-looking title, or deciding which font or colours are best.
Incorrect spelling is going to be the first thing a client or producer will notice, and it’s one of the easiest mistakes to avoid. To my knowledge, there’s no spell-check on Premiere so it’s good practice to put your writing in a Word or Google document and run spell-check, or copy and paste the titles from the source into the project.
Even checking upper/lower case characters, and making sure you’ve got your registered or copyright logos when necessary, can make all the difference to your workload and reduce the amount of revisions.
4. USING AUDIO EFFECTIVELY
Baby Driver is one of my favourite films. It combines sound with cinematography in a way that I’ve never seen done before. The film combines musical accents with video cuts, and righteous melodies with suitable images, to fit in time and pace with the music and to help the video – pardon the pun – drive.
We’re not going to get as complex as Paul Machliss when it comes to editing, but creating audio that locks with music is a lot easier than you’d think.

Where you see the audio peak, create a cut. Obviously, it still needs to be visually appealing, but this can all be adjusted with some fine-tuning. Another tip is to take time out to listen to the music you’re editing to, become familiar, and find a way to incorporate the grandiose sections of music with the best video. You can always cut sections of the music you’re using to create a “verse, bridge and outro” and use the audio transition ‘Constant Power’ to fade seamlessly into each section, as shown below:

This can sometimes sound a bit artificial, so it may need a bit of fine tuning to find the relevant sequence that makes it work. It’s often better when coming out of a section where the music is quieter – such as an interview – to apply these transitions, as it is less noticeable that the music has been cut.
This video explains how this works in Baby Driver.
5. GET USED TO DIFFERENT SOFTWARE
I love Premiere Pro, but there are some things I need Final Cut for, such as call-outs. There is an amazing plugin for Final Cut called mCallouts, which has an inbuilt tracker to call out whatever you’re wanting to focus on – no more time-consuming keyframing: with the callout function on Final Cut, labelling a subject is complete in seconds.
Having the ability to switch between the two programmes increases my workflow depending on the video. If I’m doing an edit for a grand piece of architecture that needs plenty of callouts, or something that needs more energetic or exciting filters or transitions, or if I’m given a project that’s half complete in the Final Cut project file, I know it’s something I can comfortably use. If I need something with powerful colour tools, a fast workflow, or I need to do 2D/3D graphics, I can stick with Premiere/After Effects.
To find out more about how out video team can put their expertise to work for you, contact us today.
Harris »